Class 10 Info. Tech. Digital Documentation Advanced
Session 2: Insert and Use Images
Important Question Answer
Q.21. Differentiate between Keep Scale and Keep image size.
Answer: Keep Scale
- Keep scale is selected by default.
- In Keep scale cropping the image does not change the scale of the picture.
Keep Image Size
- When Keep image size is selected,
- cropping produces enlargement – for positive cropping values,
- shrinking – for negative cropping values,
- distortion of the image so that the image size remains constant.
Q.22. What do you mean by Resizing an Image? Write the steps to resize an image.
Answer: Resizing means changing the size (width or height or both) of an image as per requirement.
To resize an image follow these steps:-
- Click the picture, if necessary, to show the green resizing handles.
- Position the pointer over one of the green resizing handles. The pointer changes shape giving a graphical representation of the direction of the resizing.
- Click and drag to resize the picture.
- Release the mouse button when satisfied with the new size.
Q.23. Differentiate between corner handles and side handles.
Answer: The corner handles resize both the width and the height of the graphic object simultaneously, while the other four handles (side handles) only resize one dimension at a time.
Q.24. How to retain the original proportion of the graphics while resizing?
Answer: To retain the original proportions of the graphic,
- Shift+click one of the corner handles, then drag.
- Be sure to release the mouse button before releasing the Shift key.
Q.25. Can you rotate an image in OpenOffice Writer?
Answer: No. Writer does not provide a tool for rotating a picture.
Q.26. Write steps to rotate a picture in OpenOffice.org .
Answer: As you know Writer does not provide a tool for rotating a picture.
To Rotate an Image follow these steps:-
- (a) Open either Open Office Draw or Impress. File > New > Presentation/Drawing.
- (b) Select the image, then in the Drawing toolbar select the Rotate icon.
- (c) Use the red handles at the corners of the picture and move the mouse in the direction you wish to rotate.
Q.27. How can you change the rotation center?
Answer: When you select the rotate icon, it will show a black crosshair, which indicates the rotation center. By moving it to the desired position you can change the rotation center.
Q.28. How can you restrict the rotation angle to multiples of 15 degrees?
Answer: To restrict the rotation angle to multiples of 15 degrees keep the Shift key pressed while rotating the image.
Q.29. How can you create drawing objects?
Answer: To create a drawing object, first of all, open the drawing toolbar by selecting View > Toolbars > Drawing.
(a) In the drawing toolbar, select the drawing object tool.
(b) Move the cross-hair pointer to the desired position in the document.
(c) Click and drag to create a drawing object. Release the mouse button.
Q.30. Write the steps to change or set properties of Drawing Objects.
Answer: To set or change the properties of Drawing Objects, do the following –
(a) Select the object.
(b) On the Drawing Object Properties toolbar, click on the icon for each property and select the value you want for that property.
Q.31. Which dialog box allows specifying the position & size, rotation, and slant and corner radius properties?
Answer: Position and Size dialog box.
To open it right-click on the drawing object and then click Position and Size.
Q. 32. Write the steps to group drawing objects.
Answer: To group Drawing Objects, do the following –
- Select one object, then hold down the Shift key and select the others you want to include in the group. The bounding box expands to include all the selected objects.
- With the objects selected, hover the mouse pointer over one of the objects and choose Format > Group > Group from the menu bar or right-click and choose Group > Group from the pop-up menu.
Q. 33. How to control the positioning of graphics / images / drawing objects with text in OpenOffice writer?
Answer: The positioning of graphics / images / drawing objects is controlled by changing of these settings.
(a) Arrangement
(b) Alignment
(c) Anchoring
(d) Text wrapping
Q. 34. What do you mean by Arrangement?
Answer: Arrangement refers to the placement of a graphic on an imaginary vertical axis. Arrangement controls how graphics are stacked upon each other or relative to the text.
Q. 35. What do you mean by Alignment?
Answer: Alignment refers to the vertical or horizontal placement of a graphic in relation to the chosen anchor point.
Q. 36. What do you mean by Anchoring?
Answer: Anchoring refers to the reference point for the graphics. This point could be the page, or frame where the object is, a paragraph, or even a character. An image always has an anchor point.
Q. 37. What do you mean by Text wrapping?
Answer: Text wrapping refers to the relation of graphics to the surrounding text, which may wrap around the graphic on one or both sides, be overprinted behind or in front of the graphic, or treat the graphic as a separate paragraph or character.
Q. 38. In which menu you can find Alignment, Arrange, Wrap & Anchor?
Answer: Format Menu
Q. 39. How can you open the Picture dialog box?
Answer: To open the picture dialog box,
Click on the image to select it and then choose Format > Picture
OR
Right-click on the graphic and choose Picture on the pop-up menu.
Q. 40. How can you open the Position and Size dialog box?
Answer: To open the Position and Size dialog box,
Click on the drawing object to select it and then choose Format > Object > Position and Size
OR
Right-click on the graphic and choose Position and Size on the pop-up menu.
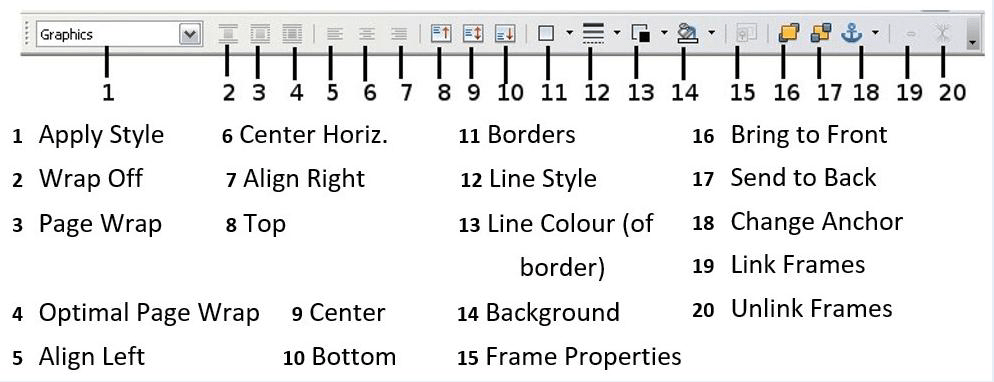
Q. 41. Write the name of all tools available in the Object toolbar for graphics?
Answer: Name of tools in Object toolbar are:-
Q. 42. Differentiate between Smooth & Sharpen Graphics filters.
Answer: Smooth softens the contrast of an image while Sharpen increases the contrast of an image.
Q. 43. Differentiate between Invert & Charcoal Graphics filters.
Answer: Invert that inverts the color values of a color image or the brightness values of a grayscale image.
Charcoal displays the image as a charcoal sketch.
Q. 44. Differentiate between Remove noise & Mosaic Graphics filters.
Answer: Remove noise removes single pixels from an image.
Mosaic joins groups of pixels into a single area of one color.
Q. 45. Differentiate between Solarization & Relief Graphics filters.
Answer: Solarization mimics the effects of too much light in a picture
Relief adjusts the light source that will create the shadow.
By Anjeev Kr Singh – Computer Science Educator
Published on : August 4, 2022 | Updated on : October 28, 2022
About the Author